Sign in using your temple’s staff sign-in page. Confirm the temple name before you begin. Available menus and actions depend on your assigned permissions and enabled features.
Make the workspace yours. Complete temple identity, contact details, language and time zone in Temple setup.
Prepare services and accounts. Add deities, poojas, sevas, items and receiving bank accounts needed by your temple.
Set up the team. Assign individual users to reviewed roles and check their access.
Choose receipt artwork and printing. Upload approved branding, preview the layout and confirm the printer’s paper size.
Follow one complete transaction. Find a devotee → choose an offering → record collection → inspect the bill and receipt → review reporting.
PRODUCT GUIDE
Find your way around
Use the sidebar or Find a menu to reach the right area. These explanations describe the sections observed in the application; use the actions available to your account.
Overview
See today’s collections, donations, bookings, upcoming services and operational alerts.
How to use this section
Review the date and temple time zone. Open the linked records or financial reports to investigate a total. Figures reflect the collections your account is permitted to view.
Billing & payments
Serve devotees at the counter and review bills, bookings, donations, collections and receipts.
How to use this section
Find the devotee, choose the offering or donation purpose, review the amount and receiving account, then record the payment. Check the saved bill and receipt before printing. Use the available refund or cancellation action on the original record when appropriate.
Devotees & temple
Maintain devotee profiles, family relationships, memberships, deities and temple service information.
How to use this section
Search before creating a profile to avoid duplicates. Keep contact details current; use linked history to trace bookings and donations. Configure poojas, sevas and annual worship before taking bookings.
Item master
Maintain the items and categories used across temple operations.
How to use this section
Create clear names and review the unit, price and active status where the form provides them. Use consistent items in billing and stock records.
Prasadam
Manage prasadam orders, production, stock, distribution and collection tokens.
How to use this section
Check availability before accepting an order. Record production and distribution in their respective screens. Use the challan or token to support collection and review remaining stock.
Festivals & events
Organise festival and event records and their schedules.
How to use this section
Maintain dates and descriptions, then review the related event details. Public visibility depends on the publication controls available in your workspace.
Hundi
Track hundi sessions and their closure.
How to use this section
Open the relevant session, record the count using the available fields and review before closure. Use the financial report to review included collections.
Notifications
Review temple notifications and communication configuration.
How to use this section
Check the configured channel and recipient before sending. A preview or saved sample is not proof that a message was delivered. Disabled channels must be configured before use.
Queue management
Organise queues and tokens for temple services.
How to use this section
Choose the relevant queue, work through the available token actions and verify its current status. Keep staff responsibilities clear at each service point.
Ornament management
Maintain ornament records and the custody operations available to your temple.
How to use this section
Use identifiable records and review the available issue, return and history controls. Confirm the responsible person and record status before completing an operation.
Inventory
Manage suppliers, purchases, goods receipts, stock locations, movements and assets.
How to use this section
Keep units and locations consistent. Record goods received and stock movements against the correct item; review on-hand and available stock before distribution.
Staff
Maintain staff information and the staff operations available to the temple.
How to use this section
Keep staff records current. A staff record and a sign-in account serve different purposes; manage account access under Users & access.
Finance
Review cash book, financial reports and accounting information.
How to use this section
Select the correct date range and inspect collection, payment and refund references. Compare exports with the displayed totals. Bank routing configuration does not itself transfer money.
Complete temple setup, then print settings and master data. Review gateway, calendar and email settings individually. Public booking and notification availability depend on the enabled configuration and plan.
Users & access
Manage sign-in users, roles, permissions and access history.
How to use this section
Assign each person their own account and the permissions required for their work. Review View, Create, Update, Delete, Approve, Export and Print separately where available. Test the account after assignment.
PRODUCT GUIDE
Different responsibilities. Clear access.
The following is a recommended responsibility guide, not a promise of default permissions. A temple administrator configures the actual module and action permissions. Custom roles can differ.
Role
Typical responsibility
Access to review
Temple Owner / Admin
Temple configuration, access policy and overall supervision.
Settings, Users, Roles and reports appropriate to the owner’s responsibility.
Temple Manager
Coordinate daily services, schedules, staff and exceptions.
Operational modules and approval actions specifically delegated by the owner.
Cashier
Find devotees, prepare bills, record collections and print receipts.
Billing, relevant bookings/donations/devotees and Print; refund access only if explicitly delegated.
Accountant
Review cash book, accounting entries, reconciliation and financial reporting.
Accounting, Finance/Reports and Export as required; operational billing access only when needed.
Reception
Register devotees and help with bookings and enquiries.
Devotees and Bookings; payment access only if reception also performs collections.
Priest
Review assigned services and the details needed to perform them.
Relevant pooja/seva schedules and minimum necessary devotee or booking information.
Inventory Manager
Maintain stock, purchases, suppliers, locations and distribution records.
Inventory and relevant prasadam/asset operations.
Staff
Carry out the specific duties assigned by the temple.
A narrow set of modules and actions matched to that person’s work.
Volunteer
Assist with assigned service points and visitor operations.
Limited queue or service information; financial and access administration usually unnecessary.
Configure and verify a role
Open Users & access → Roles and edit the intended role.
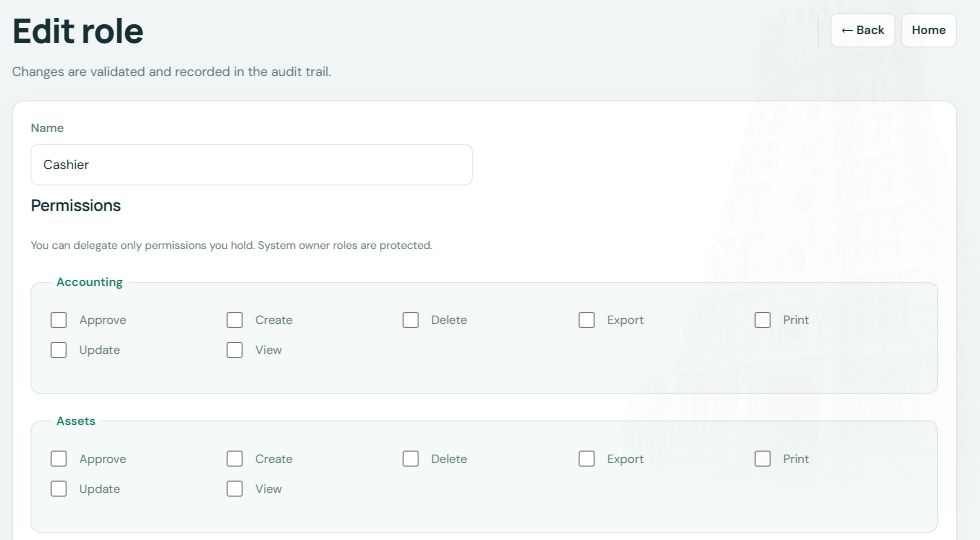
Review each module’s available View, Create, Update, Delete, Approve, Export and Print permissions.
Save the agreed policy and assign the correct role to the sign-in user.
Sign in as that user to confirm permitted work and denied actions. Owner demo “View as role” controls do not replace an independent staff-account check.
Grant only the access needed for the job. The role editor states that you can delegate only permissions you hold and system owner roles are protected.
Roles are configured by module and action. Checked boxes in your temple may differ. · Select image to enlarge. Demo workspace example.
PRODUCT GUIDE
Bring your temple’s identity to every receipt
Use your own logo, letterhead and footer alongside the built-in receipt and challan layouts.
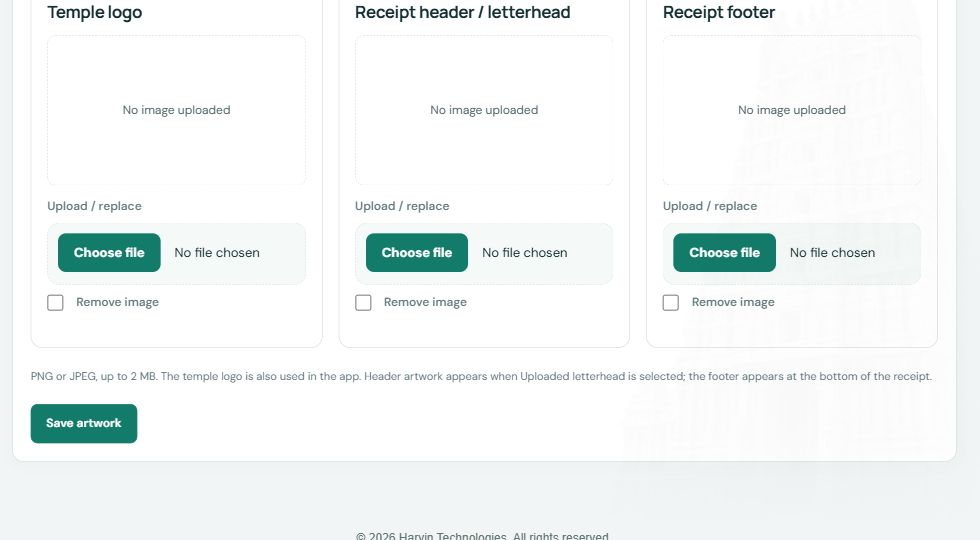
Prepare the artwork. Use PNG or JPEG, up to 2 MB. Temple setup specifies a maximum of 4096 pixels per side for header/footer images. Use wide artwork with readable text; images scale proportionally to paper width.
Upload and save. In Temple setup → Receipt header and footer, upload the header/footer. Or use Print settings → Receipt images & previews for logo, letterhead and footer; choose Save artwork.
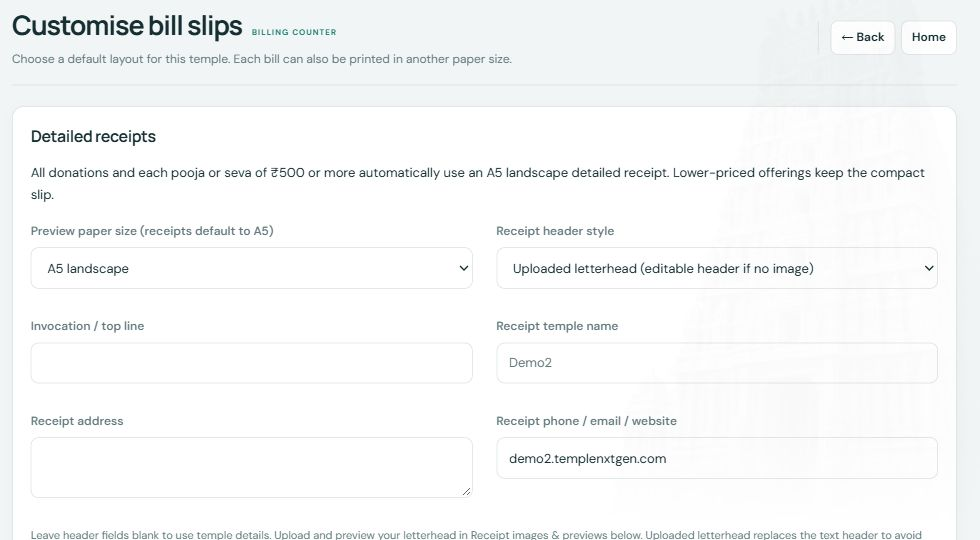
Select the header style. In Print settings → Detailed receipts, choose Uploaded letterhead or Editable temple header. The latter supports invocation, temple name, address and contact text. Blank header fields fall back to temple details.
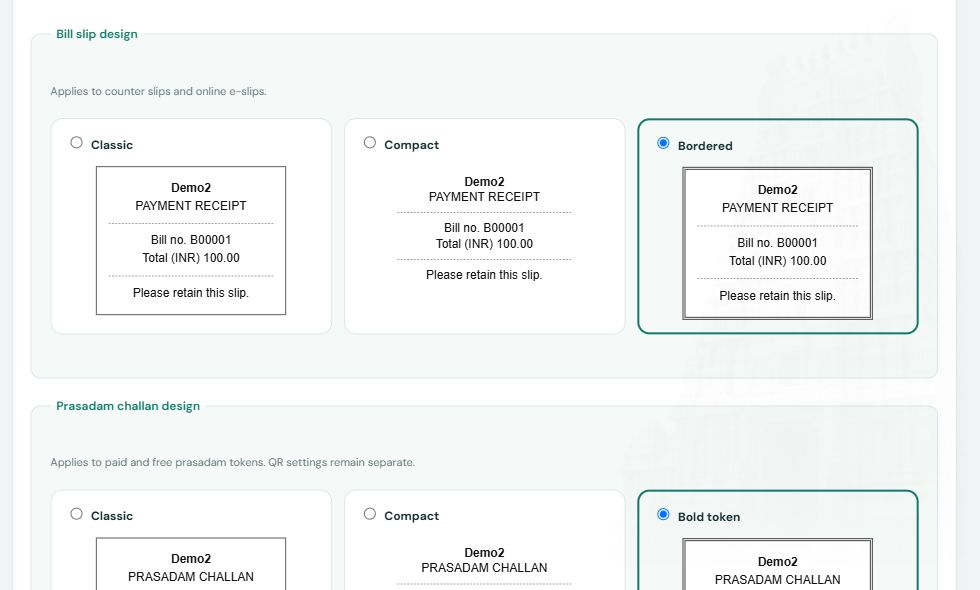
Select your layouts. Bill slips offer Classic, Compact and Bordered. Prasadam challans offer Classic, Compact and Bold token.
Match language and paper. Choose English or Kannada for slips. Paper choices include 80 mm thermal, 58 mm thermal, A5 landscape, A4 and custom width. Configure text size, margin, messages and collection point.
Review and print. Preview the detailed receipt, save print settings and check a sample on your actual printer. Match the browser print dialog to the selected paper size.
Detailed receipt paper size and editable or uploaded header controls · Select image to enlarge. Demo workspace example.Upload your temple logo, header / letterhead and footer, then save artwork · Select image to enlarge. Demo workspace example.Built-in bill slip and prasadam challan designs · Select image to enlarge. Demo workspace example.
Keep in mind: Workspace colours do not change printed layouts. Temple name, bill number, date, items and totals always print. The current Print settings screen states that donations and each pooja/seva of ₹500 or more use an A5 detailed receipt; lower-priced offerings use compact slips. Reprints use current artwork, with transaction details retained.
PRODUCT GUIDE
Set up a workspace that fits your temple
Temple identity & contact
Maintain organisation details, registration information, address, phone, email, website, currency, time zone and financial-year start month. Review the details that appear on receipts.
Changing the registered temple email requires reconnecting devotee email login, according to Temple setup.
Workspace appearance
Choose Light or Dark theme, a colour preset or custom primary/sidebar colours. Preview first and save temple settings to apply them for temple users.
Public website appearance
Choose Heritage maroon, Temple teal, Royal navy, Warm saffron, Forest green or Sacred purple. Save to apply the theme to published temple pages. Workspace and login colours are separate.
Logo & workspace banner
Use a PNG/JPEG logo up to 2 MB. The workspace banner supports up to 2 MB and 4096 pixels per side; recommended size is 1600 × 320 pixels. Keep important artwork near the centre because it is cropped to fit.
Banner and contact-footer visibility can be switched off while keeping saved details.
Bank & purpose routing
Add bank accounts before enabling multiple-account routing. Assign receiving accounts to relevant offerings and donation purposes. Cash stays in cash in hand; this setup does not move money or change gateway settlement.
Integrations & public booking
Review Cashfree gateway, calendar/panchanga and devotee email/Gmail configuration from their dedicated settings pages. Enable only services configured for your temple and verify their operation before relying on them.
Receipt layout and slip language are configured separately in Print settings. Service and item prices belong to their master-data screens.
PRODUCT GUIDE
Answers for everyday questions
Why can I sign in but see Access restricted?
Sign-in confirms your identity; your assigned permissions determine which screens you can use. Ask the temple administrator to review your role and the required module/action. A role name such as Cashier does not automatically grant billing access.
Why is Save bill unavailable?
Check that the bill contains an item, required fields are complete and the payment covers the amount due. Review any validation message and the receiving account selection. Do not record a payment twice if the first save is still processing.
How do I bring my temple’s own receipt design?
Upload your logo, wide letterhead/header and footer as PNG or JPEG in Temple setup or Print settings. Select Uploaded letterhead in Print settings, preview it and save artwork. Use the supplied slip layouts and header text controls for the remaining design.
Can I upload a Word or PDF receipt template?
The inspected upload controls accept PNG or JPEG images. Convert your approved letterhead to a suitable image before uploading. A free-form Word, PDF, HTML or CSS template import is not documented here.
Does changing the website colour change receipts?
No. Public website colours, staff workspace colours and receipt print layouts have separate controls. Configure each in its own section.
Can I use Kannada?
Temple setup supports English or Kannada for the application. Print settings has a separate slip-language selector. Names and descriptions remain as entered; receipt amount-in-words text is currently described as English.
How do I print or save a receipt as PDF?
Open the saved receipt preview and choose Print / Save PDF. Match the browser/printer paper size to the preview. Choose Save as PDF in the print dialog when available.
Why is my letterhead missing or duplicated?
Save the artwork upload, then choose Uploaded letterhead as the receipt header style. The uploaded letterhead replaces the text header to avoid duplication. Confirm you are previewing the correct temple and the latest saved settings.
Will an old receipt use my new artwork?
The Temple setup screen states that reprints use current temple artwork while transaction details stay unchanged. Keep an approved copy of important issued receipts if you need the original visual appearance.
How do bank accounts and donation purposes work?
Add accounts first. Enable multiple bank accounts if the temple needs them, then assign receiving accounts to applicable services. Donation purpose defaults are configured separately. Cash remains cash in hand; routing does not change gateway settlement.
How do I correct a refunded donation?
Open the original donation and inspect its collection and refund history. Use available authorised actions and retain the original references. A full refund is reflected on the original receipt; do not delete history to make totals look correct.
Why do dashboard and report totals differ?
Check the date range, temple time zone, included transaction types, refunds and your permissions. Today’s net collection is described as payments plus closed hundi, less refunds. Compare records within the same scope.
Why can devotees not book online?
Check whether online booking is enabled, the offering is available and the required gateway/configuration is complete. A visible booking screen or gateway settings page does not establish that a live payment integration is ready.
Why are notifications not arriving?
Check the enabled channel, credentials/configuration, recipient details and available delivery status. An unsent preview is not a delivered notification.
What should I send support?
Describe the screen, action, date/time, expected result and visible error. Include a bill/booking reference only through your authorised support channel. Redact passwords, API keys, bank details and unnecessary devotee information from screenshots.
Temple NxtGen Help Centre
Guide reviewed against the Demo2 interface on 10 October 2026. Screenshots are cropped examples; your permissions, plan and configuration may differ.